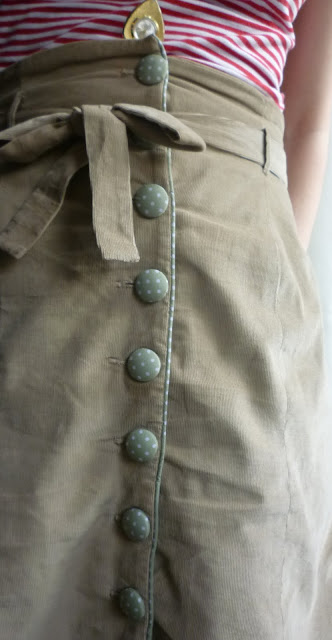
It's finished! My second Beignet skirt. This was originally made with the Colette Patterns Spring Palette Challenge in mind. That finished some time ago, but you can view my palette here, which was dominated by camel, green and red.
Here's the lowdown on the project...
Pattern
Beignet skirt from Colette Patterns
Fabric & Notions
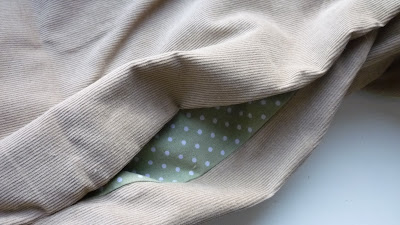
Camel cord for skirt and green & white polka dot cotton for pockets, piping and covered buttons (both fabrics from Croft Mill). I also used a light brown non-static lining fabric. I was going to use the polka dot cotton for the lining but found that using a cotton lining for my last Beignet meant that it didn't always sit properly when I was walking about, as the lining would 'ride up'. I also used 2 packets of self cover buttons and piping cord.
Pattern Adjustments
Not much - I cut a smaller size than last time and used 10 buttons instead of 12. I also added piping at the edge of the skirt front - if you're interested in doing this, keep reading...
Any challenges?
There is quite a lot of work involved in the skirt. After you've finished the main sewing, you still have to hand hem, make and sew belt loops, sew on buttons and make buttonholes, all of which I find always take much longer than I think they will!
Would I make it again?
Yes but not for quite a while as I now have a wool version for Autumn/Winter and a cord version for Spring/Summer. It's a great pattern and a really versatile item. I've already worn it twice (hence the slight creasing!) and know I will be wearing it a lot over the summer.
This project was also the second time I had used piping. The first was for the sweetheart neckline of my Crepe dress - pretty tricky! This time was a lot more straightforward, and I also took some photos to record what I did.
How to Add Piping
This is how I added piping to the front seam of my skirt. You can use shop bought bias binding or piece bits of fabric together, but I used this clever Colette Patterns tutorial to make a long piece using a square of fabric, which I think is the quickest and easiest way. However I did find that I needed a bit more explanation than was provided in the tutorial, so I also found this continuous bias tape tutorial which gave a bit more detail and helped me get my head round it. It was the first time I'd used this particular method, as last time I pieced together bits. I'm a convert to the continuous way now, which is great if you do have a square of fabric to use.
You will need some piping cord, which can be bought from a fabric shop, usually by the metre. It comes in different widths, I used 3mm, but you can get much larger widths for use on cushions, upholstery etc.
Place the cord in the centre of the bias length. You might want to use a bias tape maker, as is used in the Colette tutorial. This makes a lovely neat length of bias tape. However you don't have to do this, and the edges will be hidden between two layers of fabric in any case. As you can see, I didn't!
Fold the fabric over the cord and pin. You might also want to quickly press with an iron to help secure it or use a hand basting stitch so that you can take out the pins. I didn't, as I just removed the pins as the machine needle got close.
Using the zipper presser foot, stitch as closely as you can to the cord.
You can see how the piping is taking shape...
Mark the seam allowance along one piece of the fabric (for example, the main fabric of the skirt) and place your bias tape with cord on top. The seam you have just sewn on the bias tape should be placed along the seam allowance, ensuring that the piping cord remins facing away from the raw edge side of the seam allowance line.
Place the second piece of fabric (eg, the skirt facing) on top and hand baste along the seam. Feeling with your hands where the piping cord is, baste along what would be the same line you have marked on the fabric underneath. Obviously you can't see this line, so make sure your stitches run to the outside of the piping cord, closest to the raw edge of the fabric.
Sew along this same line as your basting stitches. Remove basting stitches and turn fabric around the right way
Done!
I really love the effect you get with piping, and it can easily be incorporated into so many projects.
I hope you all have a lovely Easter weekend. I will be using the time to catch up with Sewaholic's Crescent Sewalong, and make some progress on my cardigan.
Happy Easter!
K x


Great skirt, I love it made up in corduroy it makes it much more casual. I also have to say your shoes are awesome too
ReplyDeleteLOVE the skirt! I've recently been converted to piping as well...I love the effect and this looks fantastic!
ReplyDeleteOh, it looks marvellous!! I love the piping detail and those polka dot buttons are fabulous! I really like your shoes, too. Where did you find them?
ReplyDeleteThanks for the lovely comments! My shoes are from TK Maxx, bought a couple of months ago. The make is 'Red Tape' - not one I've heard of before!
ReplyDeleteYour skirt's brill, I love the waistband. And thanks for the really helpful piping info - I love the look but it always looks too complicated... might be tempted to give it a go now!
ReplyDeleteIt's really lovely and I love the covered buttons and piping. I'll definitely bookmark your piping tutorial, it's something I've been meaning to try ever since I saw your crepe! x
ReplyDeleteThanks Lucy and Jane! Hope you both give piping a go, there are so many possibilities...
ReplyDeleteI love the cover buttons and the pipping. I think adding little details like these make projects more unique. I will definitely be using piping in a project soon. Thanks for the tutorial.
ReplyDeletetoo too adorable! love it so much, and thanks for the tute!
ReplyDeleteI might totally steal that piping idea on my next Beignet make. I love piping, too!
ReplyDeleteHello, I saw your Beignet on the Colette Patterns forum and just had to stop by and say hello!
ReplyDeleteI really love your Beignet and, oh wow, those buttons are adorable! The details really add a ton to the garment. Your results really make me want to go back and cover buttons for the Beignet I made a month ago! :)
Amazing skirt! I love the fabric you used for the lining/buttons/piping - such a beautiful colour :)
ReplyDeleteBrilliant job! The cord really suits it I think and I'm also a piping fan! Thanks for your comment re muslins - I think you're totally right, fit around the upper body is more tricky so in future I wouldn't bother with a skirt muslin unless it looked particularly complicated. I'm looking forward to seeing your finished Crescent!
ReplyDeleteThank you ladies!
ReplyDeleteGREAT blog you have going here! Really nice tute!!!
ReplyDeletelovely skirt! love the piping detail.
ReplyDeleteThanks for the piping tutorial! It gives your skirt a lovely polished look.
ReplyDeleteI love this skirt! The polka dots make it perfect.
ReplyDelete